As engineers, we are writing and reviewing more code than ever, especially with AI accelerating development speed. At Cedar, we have found that one of the simplest ways to improve quality and reduce review bottlenecks is to master the art of the “clean commit.” Though AI reviewers continue to get better, humans remain one of the most impactful ways to prevent bugs from reaching production, and a critical method for disseminating best practices. By refining your committing process and using clean commits, you can vastly improve the readability of your code and enable faster, better reviews.
What exactly is a “clean commit,” and how does it help?
A commit is considered clean when it can be shipped independently of other changes. This means that tests must pass, bugs must not be introduced, and your commit does just one thing. A pull request (PR) consisting entirely of clean commits has a handful of advantages:
- Since each commit does one thing, each commit is straightforward to review, in turn helping you ship faster, higher quality code to your end users
- You can resolve merge conflicts more easily, one commit at a time
- It is trivial to revert/amend changes in response to PR feedback
- You will provide a lot more context to future readers of your PR (this is surprisingly valuable as your company grows and the years pass)
- Extracting changes to a separate PR is a simple matter of git cherry-pick1
What’s wrong with “messy commits”?
In short, they are really hard to review. Often multiple types of changes are lumped together, so the reviewer has to juggle context across different concerns. Sometimes rote changes like renaming a function are mixed in with new business logic, which makes it difficult to separate what matters.
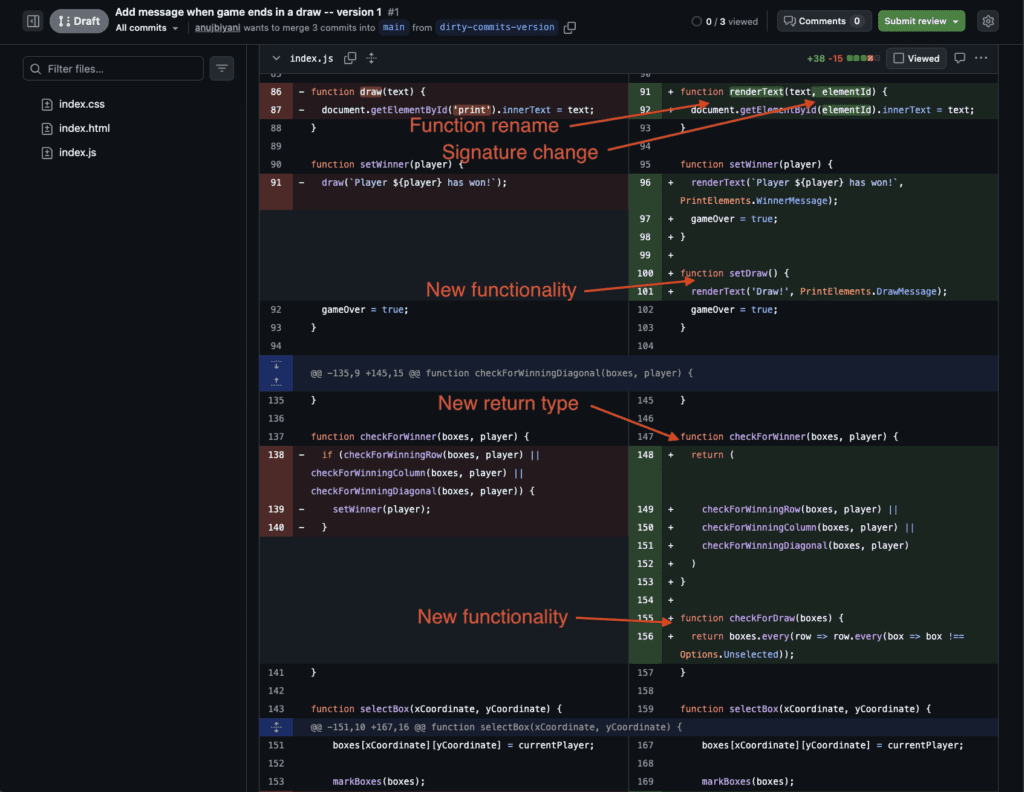
Take the example of a Tic Tac Toe project where I added a feature to show a message when the game ends in a draw. Along the way, I also renamed HTML elements, tweaked styles, changed function signatures, adjusted return values, and added logic for the draw state. Each change was worthwhile on its own, but together they produced a tangled diff.
Now imagine that same pattern in a production app with a few hundred lines in the PR. The reviewer has to process multiple categories of change at once, which slows them down and raises the chance of mistakes. This is a big reason why PRs take so long to get approved: engineers write code as they encounter issues, but that rarely translates into a focused, easy-to-understand diff for another engineer to review.
Let’s try that again, with “clean commits”
If we reorganize the code changes such that each commit is complete but small, focuses on one goal, and has a helpful commit message, then reviewers can tackle your PR in commit-sized chunks.
Let’s again look at another example before diving into the how; it has the same code as earlier, but reworked to have clean commits. Look at one commit at a time (from the home page of a PR, click on “commits”, then the SHA for the first commit, and then use the “next” button toward the upper right to move on to the next commit). How do you feel about the cognitive load now? How many categories of changes per commit do you see?
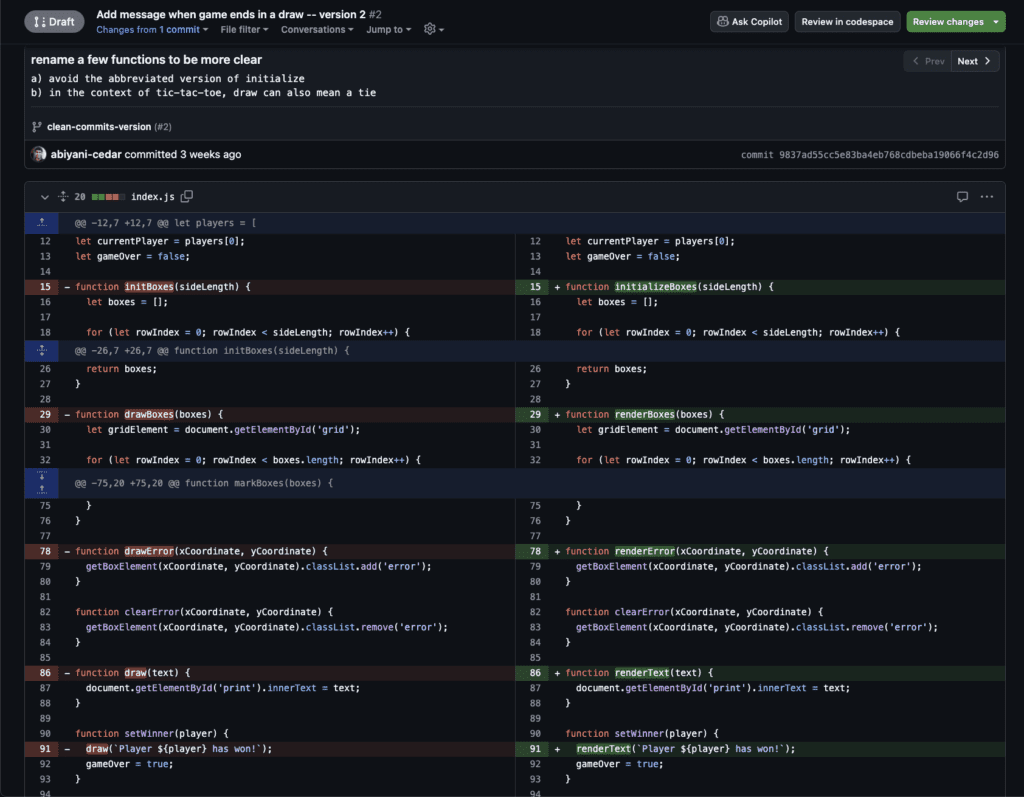
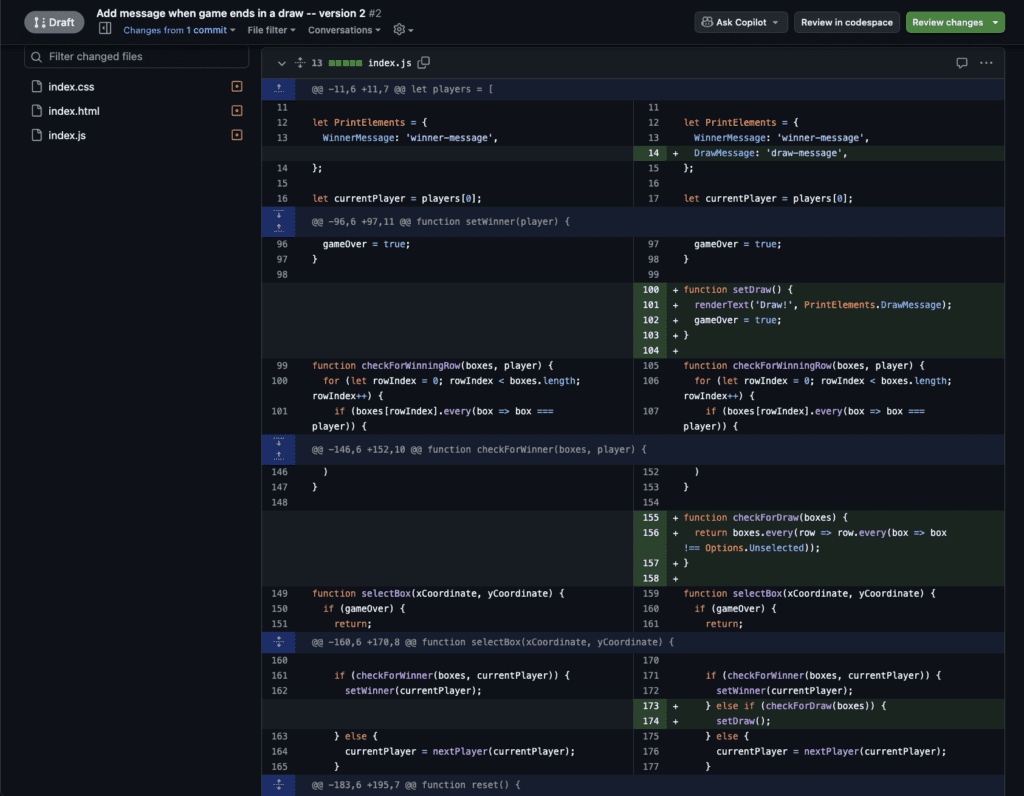
Now reimagine your complicated production app with a 300-line PR. Hopefully the impact of clean commits on reviewability is clear.
How did I write those commits so cleanly, though? The truth is: I didn’t. I wrote code more like the dirty commits PR, and then I rearranged the changes to fit the vision of clean commits.
Writing code is never that clean
Even though I’ve been practicing clean commits for years, the first time I write code it never turns out neat. Refactorings are encountered organically, and therefore implemented organically. The art comes in after you’re done with your feature, before you open the PR: by taking advantage of a couple git commands, we can restructure our massive blob-of-a-commit into a series of tidy chunks.
The tools we use are:
git add --patchgit rebase --interactive
Walking through the PR, step-by-step
Our starting point will be essentially the dirty commits version. From here I generally review the diff and think about what changes would work independently of others. Renaming initializeBoxes and all of the draw methods is a clear grouping. Refactoring the return value for checkForWinner is another candidate. Changing the signature of our method to write text to the screen is a more complex candidate: you don’t really need this change without the larger feature of adding a tie state, but it is still something that can stand alone. I usually opt to extract those types of changes anyway because they set up future commits to be more clean.
Step 1: Un-stage all changes
This is a bit of a nuclear option, but it’s great when the PR isn’t incredibly large. Count how many commits you have made since main, and undo them with git reset HEAD~3 (substituting in your number).
(If the PR is large, I will selectively un-stage commits, edit them into chunks using the following process, and then recombine them. This relies heavily on git rebase - -interactive, which I won’t go into here.2)
Step 2: Conditionally add changes
Next run git add - -patch. You will be presented with “hunks” of changes, and a list of options. You then choose to either stage those changes (include them in the upcoming commit), or leave them unstaged so you can commit them later on.
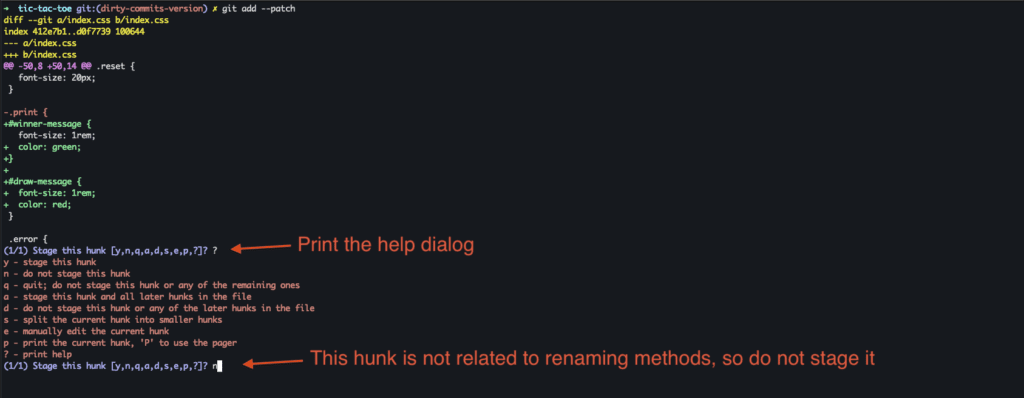
Often this is a pretty straightforward y or n for each hunk. Occasionally you might use s to split the hunk, and then y or n.
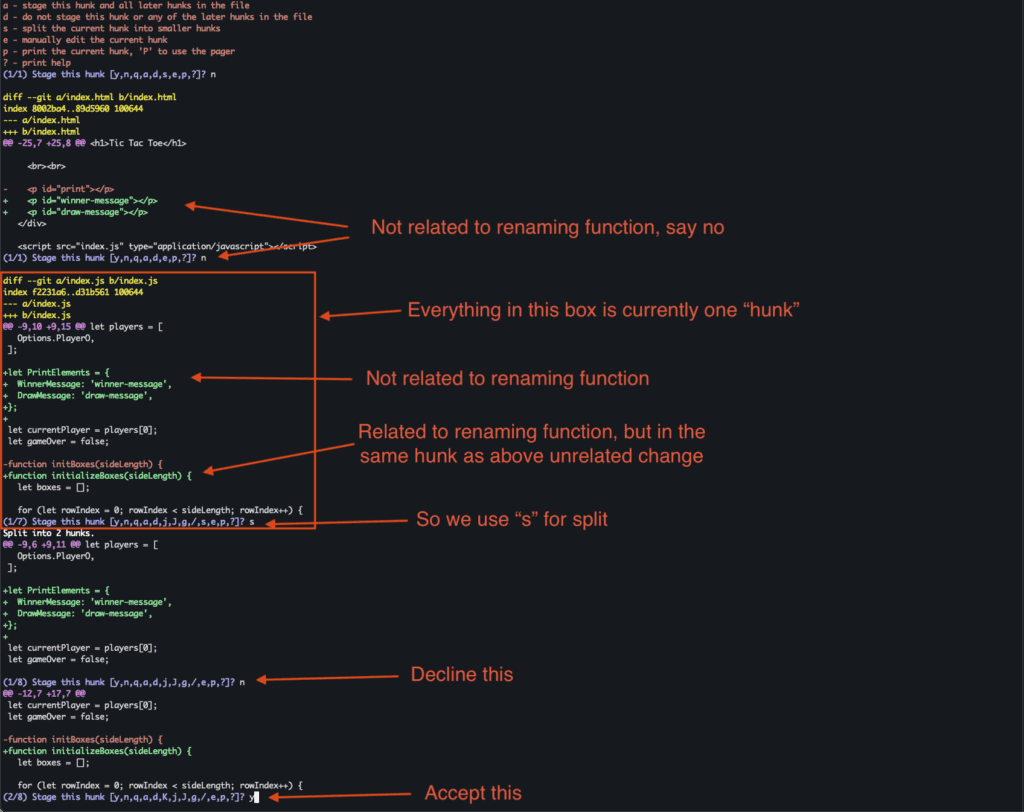
In really complex scenarios, you will need to use e to manually edit the hunk. Let’s break this down even further.
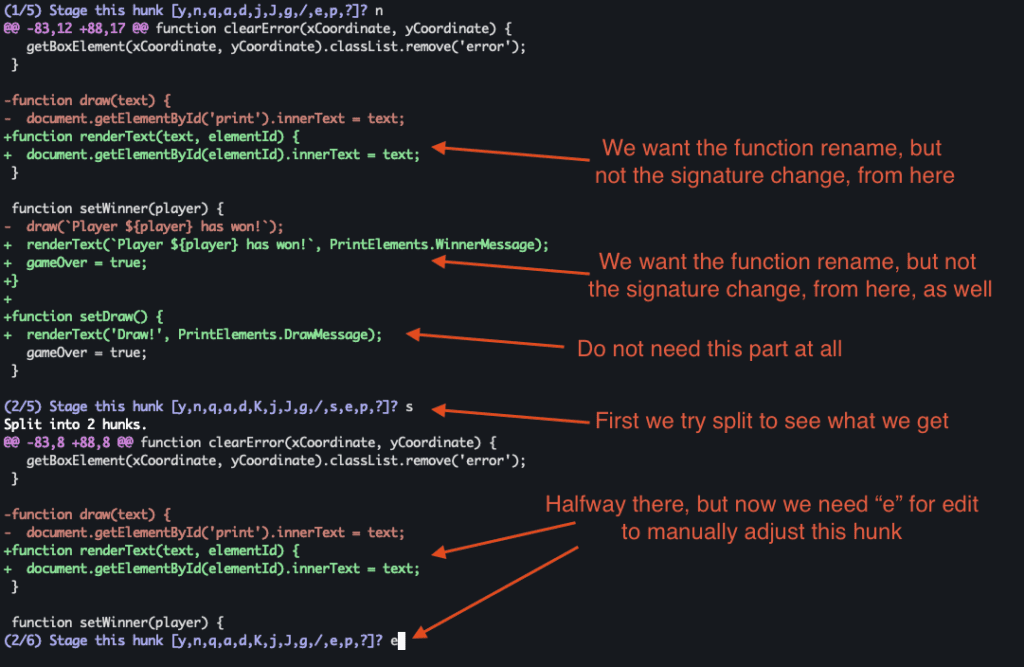
After submitting the e, we get the following:

This view is actually simpler than it looks.3 Any line with a - will be deleted (don’t worry, the changes we discard are not lost; they are simply not staged for committing), any line with a + will be kept. And any changes you make to a + line will be kept. So we manually tweak the above to look like the following:

Now the diff is just the function rename. Save this and continue. We’ll go through one more edit example because it’s complicated in a different way:

Initial view:

After our manual edits:

First we remove the extra argument to renderText. Then we delete the lines that we do not want in the diff. This leaves only the function rename in the staged changes.
Step 3: Rinse and repeat for all function rename changes
Now we just continue through the rest of the diff, staging using “y” or ignoring using “n”, or modifying using “e” or “s”, until we have only the function rename in the staged changes. Make sure you review both the staged changes git diff - -staged4 and the unstaged changes (just git diff) to make sure you didn’t miss anything, and then commit it.
And finally you repeat the above steps for all sets of changes that you previously identified, and you’ve successfully converted your intermingled code changes into a series of clean commits.
Try it—your team will thank you
While writing clean commits takes some more discipline, the benefits are significant for everyone reviewing your PR. You’ll save reviewers a lot of time, increase the quality of reviews on your PRs, and be able to merge them more quickly. There are some extra benefits, too: resolving merge conflicts is sometimes easier, reverting bad decisions within the PR becomes trivial, and there’s a lot more context available when reading a PR from years ago, to name a few.
Give it a try and I promise you, you and your reviewers will be grateful. And the more you rewrite history to achieve clean commits, the more you’ll develop the foresight to see what could be individually committed ahead of time, further accelerating your development speed. As for how AI changes this, for starters it doesn’t need to—I often just let my coding agent do its thing and then clean up after it. But in a follow-up article, I’ll talk about how you can teach clean commits to your agent as well.
Anuj Biyani is Staff Engineer at Cedar
- Cherry-picking is an easy way to take a commit on one branch and apply it onto another. Just copy the SHA of the commit you want to extract, create a new branch off of
main, and thengit cherry-pick yourshaand you’re done ↩︎ - Interactive rebasing is a blog post on its own, but it’s a skill worth learning. Check out this post for a nice guide ↩︎
- I have git set to use VIM by default, but you can change the editor to whatever you prefer. ↩︎
- If we accidentally added something that we shouldn’t have, we can un-stage it with
git reset - -patch filename. It’s essentially the same asgit add - -patch, but specifically to un-stage changes that have been staged. ↩︎
